

Recently, I needed to spin up an Active Directory lab for some testing, but didn’t want to mess with my network setup. You know that feeling when you’re about to experiment with network services and think “what’s the worst that could happen?” Yeah, I wanted to avoid that :)
Because this was a temporary setup, I wanted to avoid going through the entire process of configuring a new VLAN on the switches, router, security tools etc. The separation was necessary because I needed to work with DNS and DHCP services managed by Windows Server and did not want to disrupt my existing infrastructure.
As such, I saw this as a perfect opportunity to experiment with Proxmox’ SDN functionalities to create an isolated network for my lab that would be limited to the VMs I am working with and not interfere with my existing infrastructure.
PrerequisitesSection titled Prerequisites
Before we dive in, make sure you have:
- A Proxmox VE 8.4 or later instance (I’ve only tested these steps on 8.4 and 9.0)
- Administrative access to your Proxmox environment
- Basic understanding of networking concepts
- Estimated time: 5-10 minutes for complete setup depending on network topology
Software Defined NetworkingSection titled Software%20Defined%20Networking
A software defined network (SDN) allows you to create and manage virtual networks within a virtual environment. This is particularly useful for isolating workloads without the need for additional physical hardware or VLAN configurations.
It comprises of several components, enabling centralized management and dynamic provisioning of network resources. One of the main benefits of SDN is that it allows for great flexibility and scalability in managing network resources.
Proxmox introduced the SDN feature back in 2019 as an experimental feature, but only in recent versions has it become available through the web UI making it easier to access. It is able to emulate several network topologies, including flat networks, VLANs, and more complex setups, which is quite helpful especially in a lab environment where you might want to experiment with different network configurations.
Getting StartedSection titled Getting%20Started
Now that we understand some of the benefits of SDN, let’s dive into setting up our isolated learning lab.
In my environment I am working with Proxmox VE 8.4 and 9.0, so all the steps below are based on these versions.
Creating the ZoneSection titled Creating%20the%20Zone
The first step is to create a new SDN network in the Proxmox web interface. One advantage of zones is that we can use permissions to restrict users when deploying workloads to a specific zone and its contained VNets. This is particularly useful in multi-tenant environments or when you want to limit access to certain resources.
Navigate to the Datacenter > SDN section in the web UI.
Under the SDN branch, click the Zones option and then click on the Add button - as seen in screenshot below.
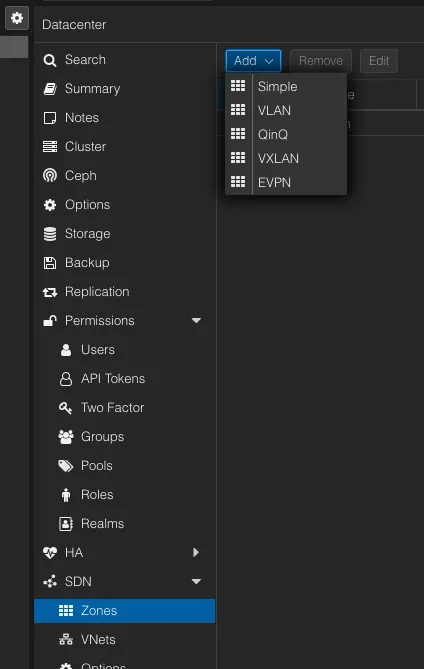
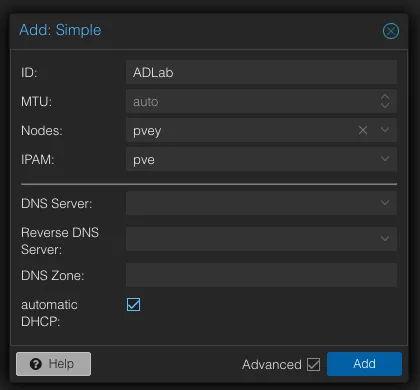
This will open a dialog where you can configure the new zone. You will need to provide a name for the zone and select the nodes that should be part of this zone. This is where we restrict the network to specific Proxmox nodes, which is useful for deploying the network only on those nodes that require it.
Additionally, Proxmox has added plugins that can automatically document assigned IPs directly into your Netbox or phpIPAM instance. Although this note focuses on a lab environment I do see it as a valuable feature for production deployments. Among other things, Proxmox also supports configuration of DNS entries through the powerdns plugin, or control the BGP and OSPF settings through the FRRouting plugin.
In my case, I needed a simpler setup with a single node, so I just created a Simple zone named ADLab, assigned it to the node I am using for my lab environment, left the IPAM to the pve plugin and selected the automatic DHCP option. This last setting is very useful as it instructs Proxmox to automatically assign IP addresses to the VMs on the network without having to manually configure each one.
Creating the VNetSection titled Creating%20the%20VNet
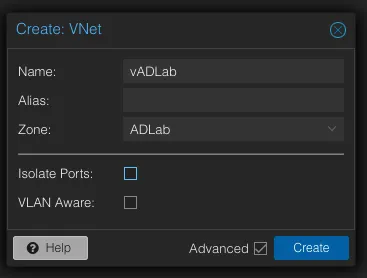
With the zone created, the next step is to create a VNet. This is done by navigating to the Datacenter > SDN > VNets section in the web UI. Click on the Add button to create a new VNet.
In the VNet creation dialog, we provide a name for the VNet and select the zone it should be associated with. We can also configure additional settings such as Isolate ports or make the vnet VLan aware.
Configuring the SubnetSection titled Configuring%20the%20Subnet
With the zone and vnet created, the next step is to create a Subnet. This will allow us to configure a few things, like:
- Restrict the IP addresses we can define on a specific VNet
- Enable SNAT on a VNet in layer 3 zones
- Auto assign IPs on virtual guests (VM or CT) through IPAM plugins
- DNS registration through DNS plugins etc.
The Subnets section is located on the right side panel of the VNets settings page in the web UI. Click on the Create button to open the Subnet creation popup.
In the Subnet creation dialog, we provide an IP subnet address using the CIDR notation for the Subnet field, and add the Gateway IP address. To allow the VMs on this network to reach the internet we also need to enable the SNAT option. Enabling Source NAT (SNAT) allows VMs from inside a VNet to connect to the outside network by forwarding the packets to the node’s outgoing interface.
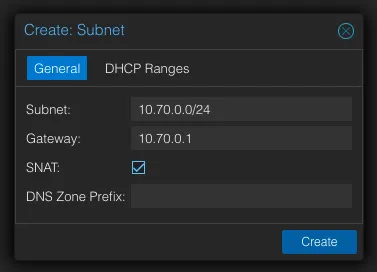
I also wanted to have a predictable set of IPs addresses assigned by DHCP to my VMs, so I configured the Subnet with a specific range of IP addresses that I could use for this case, under the DHCP Ranges section of the dialog.
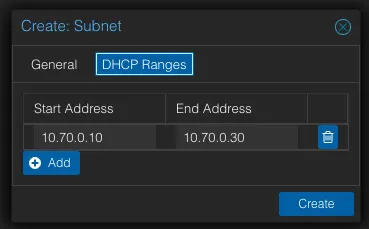
With the setup being done, the last step in order to enable the SDN network is to apply the configuration. This is not really that intuitive, as you need to go back to the main Datacenter > SDN view and click on the Apply button to push the changes to the Proxmox cluster.
Assigning VMs to the VNetSection titled Assigning%20VMs%20to%20the%20VNet
With our network infrastructure configured, we’re ready to start deploying VMs into our isolated environment.
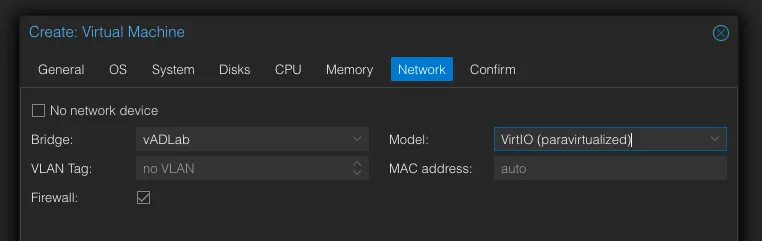
Once the configuration is applied, we can start creating VMs, or edit existing VMs, and assign them to the newly created VNet. When creating a new VM, you can select the VNet from the Network tab in the VM creation dialog, shown in next figure…
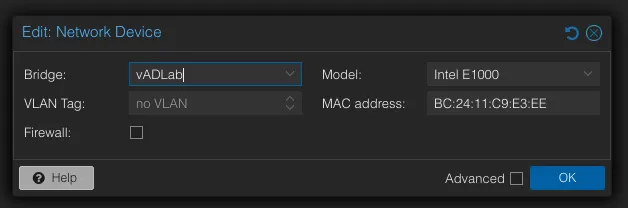
… and for existing VMs, you can edit the VM’s hardware settings and select the VNet under the Bridge dropdown for the Network Device, shown in the next figure
That’s it. The VMs can now communicate with each other in an isolated environment and we can experiment with different network configurations without affecting the rest of the infrastructure.
The DHCP ProblemSection titled The%20DHCP%20Problem
Everything seemed to be configured correctly, but working with new implementations rarely go that smoothly. Here’s where I hit my first significant roadblock.
While setting up the zone you might remember that we checked the automatic DHCP option. However, my VMs were not getting an IP address automatically, which was quite frustrating.
So, after quite a bit of time debugging why my VMs were not getting an IP address, I found that I needed to install dnsmasq on the Proxmox node where the VNet was created. This is because Proxmox uses dnsmasq to provide DHCP services for the VNet. The docs mention that in order to get DHCP running on the VNet I needed to install dnsmasq, but the text is so short, ambiguous and spread across several sections that it is very easy to miss it.
After identifying the missed step, I installed the dnsmasq package on the Proxmox node where the VNet was created using the following command (from the docs):
apt-get install -y dnsmasq# disable default instancesystemctl disable --now dnsmasqEven after installing dnsmasq and rebooting, my VMs were still not getting an IP address. After some more logs digging, I stumbled across a Youtube video from House of Logic blog - if you are seeing this: thank you - which pointed me to the fact that dnsmasq needs to be configured as an authoritative DHCP server in order to be able to serve IP addresses automatically. Which would make sense, but this is not mentioned anywhere in the Proxmox documentation.
To enable this, you need to edit the /etc/dnsmasq.conf file and uncomment the following line:
...# server for your campus/company accidentally. The ISC server uses# the same option, and this URL provides more information:# http://www.isc.org/files/auth.htmldhcp-authoritative...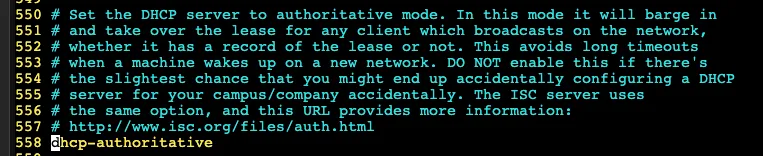
Immediately after restarting the dnsmasq service, my VMs were getting IP addresses from the VNet.
Lessons learnedSection titled Lessons%20learned
Through this setup process, I learned several important lessons that will save you time and headaches:
-
Choose non-overlapping subnets: Always use IP ranges that don’t conflict with your existing home network to avoid routing confusion.
-
Use logs for debugging: Proxmox provides extensive logging that can help you troubleshoot issues. And they are conveniently accessible through the web UI at
Proxmox Node > System > System Log. -
VMs will access network resources using Proxmox’s IP: When SNAT is enabled and VMs need to access network resources, or the internet, they will use the host node’s IP address. This is important to keep in mind as it can have unintended consequences for routing and firewall rules.
-
Every change requires an apply and restart: After making changes in the SDN configuration, always remember to click “Apply” to ensure the changes are deployed. Restarting the network interface will be required as well, but I found that it does not guarantee that the changes will be applied for the VMs that are already running. The only way I found to consistently make sure all the changes are applied correctly is to restart the Proxmox node. This is especially true when it comes to disabling the SNAT configuration or reassigning IP addresses.
Troubleshooting Common IssuesSection titled Troubleshooting%20Common%20Issues
Beyond the DHCP configuration challenges I encountered, here are some other potential gotchas to watch for:
- Firewall: Check both Proxmox firewall settings and VM-level firewalls in case of connectivity issues
- Wrong subnet selection: Double-check that VMs are assigned to the correct VNet and use appropriate names for VNets as these will show up in the VM’s network configuration
- DHCP configuration quirks: The
dnsmasqinstallation and configuration steps are not very clear in the documentation, so be prepared to troubleshoot this if your VMs aren’t getting IP addresses.
Cleanup and TeardownSection titled Cleanup%20and%20Teardown
When you’re done with your lab, cleaning up is straightforward:
- Delete or reassign VMs to other networks
- Remove the Subnet from the VNet
- Delete the VNet
- Remove the Zone
- Apply the configuration to push changes
This ensures no orphaned configurations remain in your Proxmox environment.
ConclusionSection titled Conclusion
Setting up an isolated Active Directory lab using Proxmox SDN turned out to be more straightforward than I initially expected, once I worked through the DHCP configuration quirks. The ability to create completely isolated network environments without touching physical infrastructure or existing VLANs is incredibly powerful for testing and learning scenarios.
This approach has saved me significant time compared to traditional VLAN setups, and the isolated nature means I can break things without worrying about impacting my other systems.\
Whether you’re testing Active Directory configurations, practicing incident response scenarios, or learning new technologies, I do recommend looking into this SDN approach as it provides a clean, repeatable foundation.
What’s Next?Section titled What%u2019s%20Next%3F
This isolated network foundation opens up numerous possibilities for future lab scenarios. Some ideas I’m considering for future posts:
- Setting up the actual Active Directory domain controller
- Implementing additional Windows Server roles in isolation
- Exploring more complex SDN topologies
What lab scenarios would you like to see covered? Have you used Proxmox SDN for your lab environments? What challenges did you encounter, and how did you solve them? I’d love to hear about your experiences in the comments below.